Extension Basics
Making an Extension
Since Pixelorama v0.10, you can add/remove extensions to/from Pixelorama. Extensions are distributed as PCK (.pck) or ZIP (.zip) files and you can manage them from Edit > Preferences > Extensions. This is a step-by-step guide of how you can make an extension for pixelorama. For this tutorial the extension we'll make will be called "Example"
Prerequisites
First of all, there are a few prerequisites for you to start creating extensions.
- Some knowledge of GdScript.
- A ready to use Godot executable (See the Pixelorama Channgelog to figure out which version to use).
- Source code of Pixelorama (This is optional but will speed up your debugging workflow).
Process
- First of all make a new Godot project of name "Example" (the project name is irrelevant but for simplicity we'll name it the same as our extension).
- After that make a directory structure as shown in the image below.
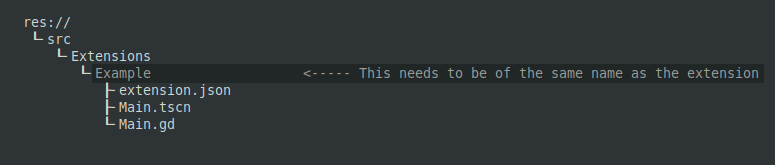
The File Structure of any basic extension.
In the "Example" folder you can see three files;
- extension.json
- Main.tscn
- Main.gd
These files are the bare minimum required for an extension to function properly. Let's go through each of them one by one:
extension.json
The extension.json file serves as a basic configuration file for the extension. A proper extension.json file should contain the below content
{
    "name": "Example",
    "display_name": "Anything you want",
    "description": "What the extension does",
    "author": "Your Name",
    "version": "0.1",
	"supported_api_versions": [3],
    "license": "MIT",
    "nodes": [
        "Main.tscn"
    ]
}
| Key | Description |
|---|---|
| name | The extension name (in this case Example) |
| display_name | The name actually shown by pixelorama in it's extension list (it can be anything) |
| author | Author of the extension |
| version | version of the extension, it is a floating value so versions like 1.0.3 etc. are invalid |
| supported_api_versions | (Optional) Announces the Api level of the extension |
| license | Name of license used by the extension |
| nodes | Array containing name of scenes that should be instanced as soon extension gets enabled (in this case it is Main.tscn) |
supported_api_versions is an optional key that is used by pixelorama to determine if it is compatible with it's Api ( E.g [ 3 ] means you are making extension for Pixelorama 0.11.x). If your extension is compatible with multiple api e.g (level 2 and 3) then use [ 2, 3 ]. To find the Api level of pixelorama open the project.godot file in Pixelorama's Source and look for config/ExtensionsAPI_Version
Main.tscn
As mentioned above, the Main.tscn will be instanced in pixelorama as soon as the extension gets enabled. a GdScript file (In this case Main.gd) is attached to this scene.
Main.gd
As mentioned above, the Main.gd is a script written in GdScript, that will be run as soon as the extension gets enabled. It can be used to
- Instance further scenes (.tscn files).
- Or contain the core extension code.
The content of a basic Main.gd file is;
extends Node

# NOTE: use get_node_or_null("/root/ExtensionsApi") to access the extension api.

# Runs as soon as extension is enabled. This script can act as a setup for the extension.
func _enter_tree() -> void:
	pass


func _exit_tree() -> void:  # Extension is being uninstalled or disabled
	# remember to remove things that you added using this extension
	pass
Limitations and Workarounds
- New custom classes (e.g
class_name Foo) can't be created in the extension, but there is a workaround. Don't assign scripts custom class names and instead of doingFoo.new()if say your script "Foo.gd" is located atres://src/Extensions/Example/CustomClasses/Foo.gdthen you can use
preload(res://src/Extensions/Example/CustomClasses/Foo.gd).new()
- If your extension needs to use pixelorama's classes (e.g
Project,BaseCel,BaseTooletc) make empty class scripts and place them inres://src/Extensions/Example/EmptyClasses/. For example an empty class scripts ofProjectclass will look like;
# This is example of an empty Project class
class_name Project
extends Reference

# Empty Variables (variable containing only name and type but no value)
# obviously they are not all of Project class variables
# They are written to remove (Variable not found in class: Project) errors
# (add more variables from the real Project class if your extension needs them)
var name: String
var size: Vector2
var undo_redo: UndoRedo
var tiles: Tiles
var undos: int
var can_undo: bool
var fill_color: Color
var has_changed: bool


# Empty functions (they don't contain any actual code)
# obviously they are not all of Project class functions,
# They are written to remove (Method not found in class: Project) errors
# (add more functions below from the real Project class if your extension needs them)
func _init(_frames := [], _name := tr("untitled"), _size := Vector2(64, 64)) -> void:
	return  # As the functions returns void, we are using return without a value


func remove() -> void:
	return  # As the functions returns void, we are using return without a value


func serialize() -> Dictionary:
	# As the functions returns a value, we are returning the most basic value of the same type.
	# for a Dictionary, it's smallest value is just an empty dictionary
	return {}
Exporting the Extension
Now that you have the basic extension code ready, let's export it;
-
From the top bar in Godot editor go to Project > Export and choose any platform option (the extension should work on other platforms regardless of which platform you choose).
-
In then go to the Resources tab and do the following changes;
Export Modeshould be set toExport all resources in the projectFilters to export non-resource files/foldersshould be set to*.jsonFilters to exclude files/folders from projectshould be set tores://src/Extensions/Example/EmptyClasses/*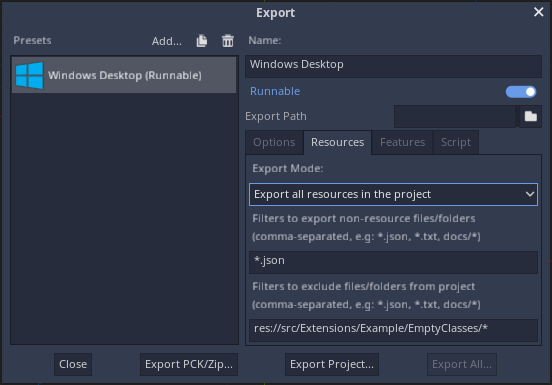
Extension Export Options.
- After that, press Export PCK/Zip and export it as a PCK file (both Zip and PCK extensions are recognized by pixelorama but PCK is recommended). The name of exported pck should be the same as the
nameof your extension, in this case it should beExample.pck
Installing the Extension
To install an extension, from pixelorama's top menu go to Edit > Preferences > Extensions and click Add Extension.
A more easier way would be to drag and drop the extension in Pixelorama.
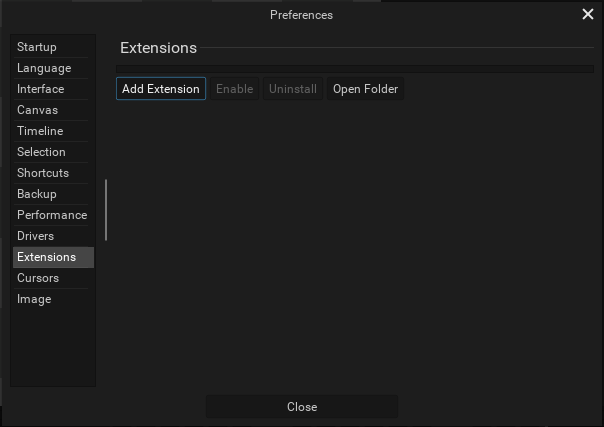
Adding an Extension.
After it has appeared in the list of extensions, select it press Enable.
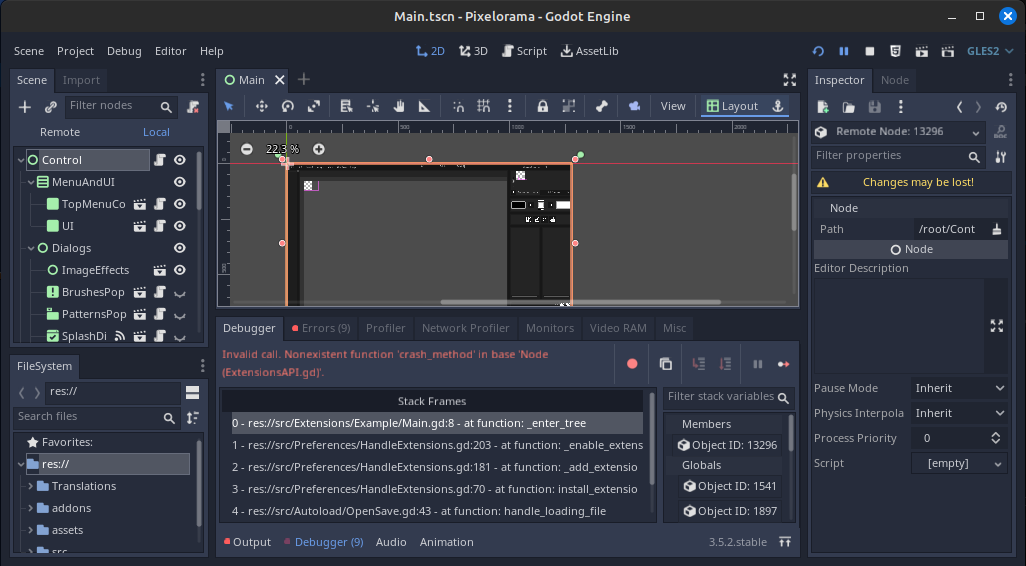
Debugging an Extension
In order to debug an extension, you need to have the source-code of your target version of Pixelorama open in another godot instance. To start debugging, run pixelorama from godot and follow the steps in Installing the Extension. The debugger of Godot instance housing pixelorama's source-code will be used to debug the extension.